A page dedicated to node #21 of PatrasWireless
Intro
This page was created to describe the construction process of a full-bloan, low budget (and I mean LOW budget) and very scalable 802.11 HotSpot, for deployment in the most hostile urban environment you can think of: the terrace of your apartment block. Taking for granted that the reader has a previous Wifi knowledge, I will list our project goals:
- Non-Stop operation of the WiFi hardware.
- Robust outdoor installation.
- Low budget final result, while fully scalable design.
- Safe power supply for the whole node from 1st floor to terrace.
Power Supply
Starting backwards, the means of power supply was the first issue that concerned us. The only way to supply power was from my flat (1st floor) to the terrace(7nth floor). Safety first. Could NOT afford an auntie getting fried because she accidentally cut the 220V wires. The solution? Two AC transformers 220V~ -> 50V~. The current flowing on the cable is much less than when using 220Voltage, so it not (so) deadly :). These transformers are cheap, cost less than 20e. 220V in from my room's AC outlet, outdoors 50V, into the other transformer and back to ~210V and into the pc's regular PSU.
Here is the design
                +------------+                  +------------+
             AC |            | AC            AC |            | AC
home 220V ]-----+ 220 to 50V +-----safely-------+ 50 to 220V +-------[ rooftop PC
                |            |                  |            |
                +------------+                  +------------+
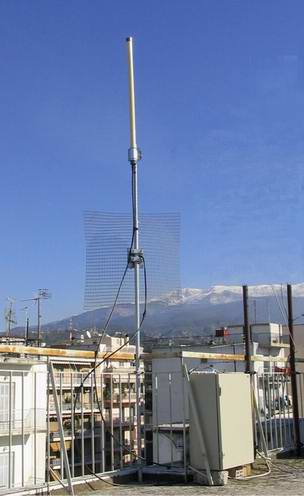
Outdoor Installation
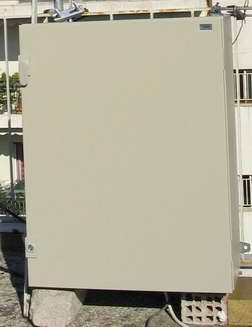
With the power problem solved, next in priority was the outdoor installation of the hardware. We need to be 101% waterproof. We finally chose a metal box used for electrical installations, with dimensions 60x50x30cm. We chose so large a box, because of the size of the transformers, and also to ensure a proper cooling mechanism. Surely similar results can be accomplished with smaller boxes. Another thing is that the metal box decreases RF noise inside it, so the wifi cards can work better.
Wireless Hardware
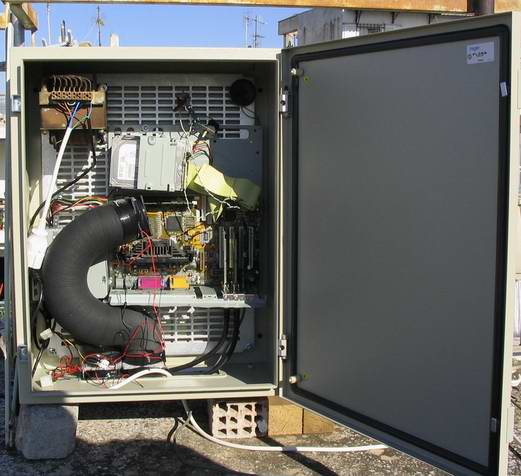
The terrace PC is comprised of the following:
- Pentium III @ 450Mhz
- 64MB RAM
- Ether: Realtek 10/100 pci
- WiFi : 3xNetgear MA311 pci
- OS: Debian Woody custom kernel
- WiFi driver: HostAP 0.0.4 w/ txpower patch
- 21dB directional Antenna
- 10dB Omnidirectional Antenna
- 17bB Pacific wireless directional
We screwed the PC's motherboard with the HDD and the PSW on the back grid of the box. Note that we have screwed the motherboard WITH its old metal "back" which is in the shape of the Greek letter "Γ". This way we ensure that the pci cards will sit on the motherboard firmly and no jerk around as we change RF cables and such things.
Note the usage of big paper air pipes, that create an outward flow of air in the box. After 1 year of HARD greek weather conditions (ultra high temps in summer due to sushine) the rooftop PC is ROCK solid!.
Wireless Software
We 're using debian linux of course! But, we make our lifes easier as wifi-node admins, by using WiFiAdmin, which is a very powerful web interface for the linux wireless extensions(e.g HOSTAP uses them). It produces wonderful graphs and helps the community grow by allowing everybody to register as a user and post his/her services!
Final Cost
Here's what it cost me:
- PIII@450 : 0e
- Transformer x 2 : 0e
- Netgear MA311x3 : 120e
- Pigtails: 25e
- RF cables - connectors: 65e
- Metal box: 75e
- Air pipes, fans : 20e
Total ~ 300e
Verdict
I'm sure this can be done more cost and space efficiently. This page demonstrates my own mistakes in this effort. After one year of 24/7 outdoor usage, I can say one thing: our design succeded 100%. We have experienced no outages in HotSpot uptime that have to do with the outside environment. You can reach me here. Click here for an angled view of the box.