create unity vuforia android plugin
Creating a plugin for Unity3D seems, at the end, that it was not such an easy task to do. For the purposes of my project i had to create a plugin to call from my Unity application. The term plugin, for this post, is a native Android application exported as a Jar file using Eclipse and importing it in a Unity project so you can combine your custom activities with Unity.
I found many tutorials over the net on how to do such a thing but, even they were REALLY helpful, they were not talking about a Unity project using Vuforia packages. So things become a bit different when you build an augmented reality application and you want to create plugins. Finally, with some help from the fine moderators at Vuforia forum, i managed to make it work.
Before we start i have to mention that this post is not for beginners. You have to read a lot of things to understand what’s behind the scenes and how things work in order to proceed. The truth is that writing a plugin, in my opinion, is poorly documented and the only thing you left to do is going through the forums over and over again until you figure it all out.
I hope i can explain it well.. So, let’s start!
This solution applies to Unity 3.x and Vuforia 1.5.x versions only. For newer versions check the official tutorial here
Prerequisites
What we will need?
-
1.Eclipse + Android plugins
-
2.Unity3D (The version i used is 3.5.6)
-
3.Unity Vuforia extension. Downloads and installation help can be found here.
Eclipse Side
Start by creating a new Android project and setup it. The only thing you have to remember for later use from this process is the package name. For my project the package name will be “gr.ceid.upatras”. Make sure that the package name is identical to the package name of the Unity project (Build Settings -> Player Settings -> Android -> Other Settings -> Bundle Identifier). This is very important!!
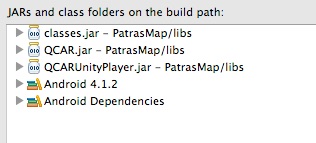
Now we should copy the jar files that we will use in the Android project. For a simple unity plugin you will need only the classes.jar file. In this tutorial we are going to need two more jars. Those would be the QCAR.jar and the QCARUnityPlayer.jar.
For the classes.jar you have to navigate to your Unity installation and right click on Unity app, show package contents. Now you go “contents/PlaybackEngines/AndroidPlayer/bin”. There you will find the first jar file. Take it by copying it to the libs directory of your custom Android project. The other two jars can be found under the “Assets/plugin/Android” directory of your Unity project. Copy both of them inside the libs directory of the Android project. One more thing before start writing the activity’s code. Add these files to your Java build path by right clicking the Android project and going to Properties. Under the Java Build Path menu select the Libraries tab and click Add External Jars... You have to do this three times.
At the end your setup should look like this:
Tuesday, November 27, 2012
By Jc
Creating the first activity. The first activity works as an intermediary that will communicate with Unity and will call the main activity of the Android project. So the code for this activity will be like this:
package gr.ceid.upatras;
import com.qualcomm.QCARUnityPlayer.QCARUnityPlayer;
import android.content.Intent;
import android.os.Bundle;
public class Binding extends com.qualcomm.QCARUnityPlayer.QCARPlayerActivity {
@Override
public void onCreate(Bundle savedInstanceState) {
super.onCreate(savedInstanceState);
}
public static void buttonClicked() {
QCARUnityPlayer.currentActivity.runOnUiThread(new Runnable() {
public void run() {
//Log.i("Binding Activity", "called succesfully");
Intent intent = new Intent(QCARUnityPlayer.currentActivity.getApplicationContext(), PatrasMap.class);
QCARUnityPlayer.currentActivity.startActivity(intent);
}
});
}
}
Note 1: The Activity we created extends the QCARPlayerActivity and not the Activity class. This is the reason we added the jars in the build path in the first place.
Note 2: We created a static function that starts a new Activity and we left the onCreate() function empty.
Note 3: We have to wrap the code of the static function inside a new Runnable(), otherwise it will crash when Unity will make calls to this function.
The next thing we have to do is to create the second activity of the project. The code for this activity:
package gr.ceid.upatras;
import android.app.Activity;
import android.os.Bundle;
import android.widget.Toast;
public class PatrasMap extends Activity {
@Override
public void onCreate(Bundle savedInstanceState) {
super.onCreate(savedInstanceState);
RelativeLayout relativeLayout = new RelativeLayout(this);
TextView tv = new TextView(this);
tv.setText("Custom Message");
RelativeLayout.LayoutParams lp = new RelativeLayout.LayoutParams(
RelativeLayout.LayoutParams.WRAP_CONTENT,
RelativeLayout.LayoutParams.WRAP_CONTENT);
lp.addRule(RelativeLayout.CENTER_IN_PARENT);
tv.setLayoutParams(lp);
relativeLayout.addView(tv, lp);
setContentView(relativeLayout);
tip();
}
public void tip()
{
Toast.makeText(this, "Activity called. Plugin is working!", Toast.LENGTH_LONG).show();
}
}
Note 1: We create the layout programmatically because otherwise i get Resource not found exception. This needs to be checked but i haven’t done it yet.
Now, we have to declare our activities in the manifest. The AndroidManifest.xml file of the Android project should look like this:
<?xml version="1.0" encoding="utf-8"?>
<manifest xmlns:android="http://schemas.android.com/apk/res/android"
package="gr.ceid.upatras"
android:versionCode="1"
android:versionName="1.0">
<uses-sdk android:minSdkVersion="8" />
<uses-permission android:name="android.permission.INTERNET"/>
<uses-permission android:name="android.permission.ACCESS_NETWORK_STATE"/>
<uses-permission android:name="android.permission.WRITE_EXTERNAL_STORAGE"/>
<application
android:icon="@drawable/ic_launcher" android:label="@string/app_name"> <!-- android:installLocation="preferExternal" -->
<activity android:name="gr.ceid.upatras.PatrasMap" android:label="@string/app_name">
<intent-filter>
<action android:name="android.intent.action.MAIN" />
<category android:name="android.intent.category.LAUNCHER" />
</intent-filter>
</activity>
<activity android:name="gr.ceid.upatras.Binding"
android:theme="@android:style/Theme.Black.NoTitleBar"
android:configChanges="keyboardHidden|orientation">
</activity>
</application>
</manifest>
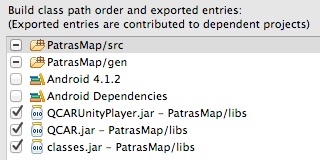
The final step from Eclipse side is to export the project as a jar file. Not entirely sure for this step but just do it anyways: before you export the project head to the Properties and under the Java Build Path again and click the Order and Export tab and select the three jars we imported at the beginning.
To export the project right click on it and select Export... Follow the steps and place it anywhere you like.
If everything went well, we have finished the Eclipse side and we can proceed with the Unity side.
Unity Side
Let’s start by copying the jar we created earlier in the Unity project under the “Assets/plugin/Android”. Now we have to complete the existing AndroidManifest.xml file that we will find in that directory. So this file must look like this:
<?xml version="1.0" encoding="utf-8"?>
<manifest
xmlns:android="http://schemas.android.com/apk/res/android"
package="gr.ceid.upatras" <!--com.qualcomm.QCARUnityPlayer-->
android:versionCode="1"
android:versionName="1.0">
<uses-sdk android:minSdkVersion="8" />
<uses-feature android:name="android.hardware.camera" />
<supports-screens
android:smallScreens="true"
android:normalScreens="true"
android:largeScreens="true"
android:anyDensity="true" />
<uses-permission android:name="android.permission.WAKE_LOCK" />
<uses-permission android:name="android.permission.ACCESS_NETWORK_STATE" />
<uses-permission android:name="android.permission.ACCESS_WIFI_STATE" />
<uses-permission android:name="android.permission.INTERNET" />
<uses-permission android:name="android.permission.CAMERA" />
<uses-permission android:name="android.permission.READ_PHONE_STATE"/>
<application
android:icon="@drawable/app_icon"
android:label="@string/app_name"
android:theme="@android:style/Theme.NoTitleBar.Fullscreen"
android:debuggable="false">
<activity android:name="com.qualcomm.QCARUnityPlayer.QCARPlayerProxyActivity"
android:label="@string/app_name"
android:configChanges="fontScale|keyboard|keyboardHidden|locale|mnc|mcc|navigation|orientation|screenLayout|screenSize|smallestScreenSize|uiMode|touchscreen">
<intent-filter>
<action android:name="android.intent.action.MAIN" />
<category android:name="android.intent.category.LAUNCHER" />
</intent-filter>
</activity>
<activity android:name="com.qualcomm.QCARUnityPlayer.QCARPlayerActivity"
android:label="@string/app_name"
android:configChanges="fontScale|keyboard|keyboardHidden|locale|mnc|mcc|navigation|orientation|screenLayout|screenSize|smallestScreenSize|uiMode|touchscreen">
</activity>
<activity android:name="com.qualcomm.QCARUnityPlayer.QCARPlayerNativeActivity"
android:label="@string/app_name"
android:configChanges="fontScale|keyboard|keyboardHidden|locale|mnc|mcc|navigation|orientation|screenLayout|screenSize|smallestScreenSize|uiMode|touchscreen">
<meta-data android:name="android.app.lib_name" android:value="unity" />
<meta-data android:name="unityplayer.ForwardNativeEventsToDalvik" android:value="false" />
</activity>
<activity android:name="com.unity3d.player.VideoPlayer"
android:label="@string/app_name"
android:configChanges="fontScale|keyboard|keyboardHidden|locale|mnc|mcc|navigation|orientation|screenLayout|screenSize|smallestScreenSize|uiMode|touchscreen">
</activity>
<activity android:name="gr.ceid.upatras.Binding"></activity>
<activity android:name="gr.ceid.upatras.PatrasMap"
android:theme="@android:style/Theme.Dialog"
android:configChanges="orientation|keyboard|keyboardHidden"/>
</application>
</manifest>
Note 1: At the beginning of the file we change the package name to the one we used in the Android project. Make sure is exactly the same!
Note 2: Near the end of the file we add the two activities of the Android project.
OK! Final step...Lets create the script that will call our activities!
In my case i have a script that does a lot of things but the part we need is inside the OnGUI() function. So the code will look like this:
public static AndroidJavaClass plugin;
void Start ()
{
if( Application.platform == RuntimePlatform.Android ) {
plugin = new AndroidJavaClass("gr.ceid.upatras.Binding");
}
//....................
}
void OnGUI()
{
if (GUI.Button(new Rect(10,10,80,20),"Show list"))
{
Debug.Log(plugin);
plugin.CallStatic("buttonClicked");
}
//....................
}
That’s it! Hopefully if you complete these steps, then by pressing the button the buttonClicked function will be called and the main activity of your application will start. This example will just toast a message but you can write your things in the activity!
I hope i didn’t miss anything.. But in any case i will keep this post updated, as i walk it through and finding new things.


© Jeries Besharat